Makerfire F3 Brushed FC
Born for Indoor FPV Drone Racing

Makerfire F3 Brushed flight controller is based on SPRACING F3 EVO FC,which is used for micro FPV indoor drone,like Tiny Whoop/Blade Inductrix quad.
Feature
- Fully programmable through Betalfight/Cleanflight,using the onboard USB port,Tune all the parameters, PID's, and rates to your perfect settings
- F3 Brushed Version:
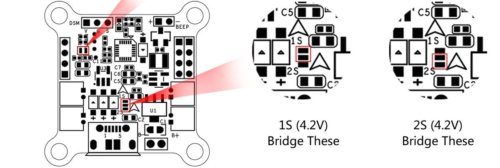
- Support 1S (4.2V) and 2S (8.4V) lipo battery,with 2s lipo you could get even more fierce racing experience than 1s
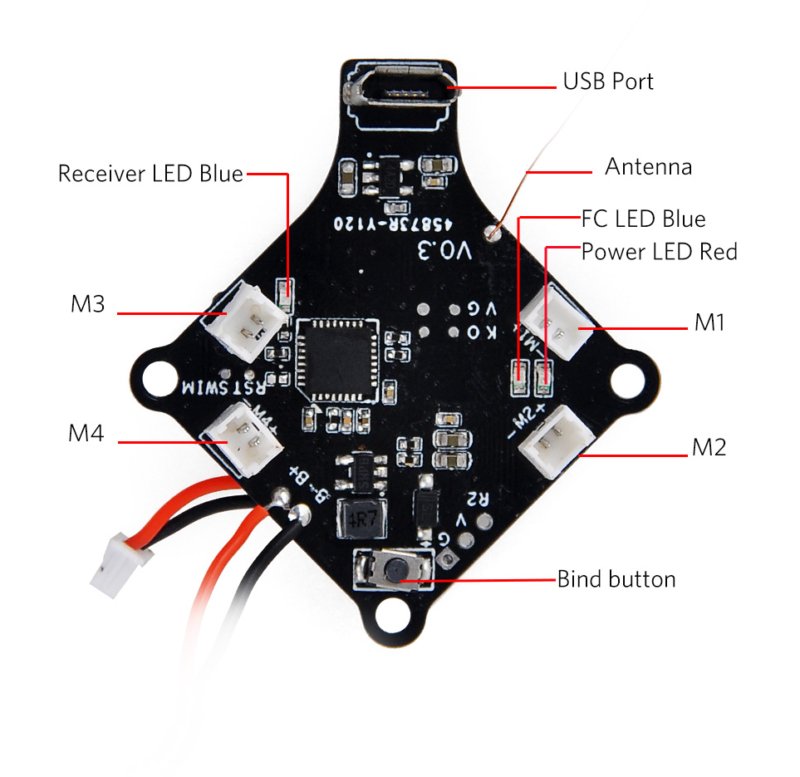
- Support 4 PWM output,support 7 x 20mm, 8 x 20mm,10 x 20mm coreless motors
- Support for PPM, SBUS, DSM receiver, support battery voltage monitor and buzzer function.
- Large current NMOS transistors enable the board to sustain up to 10A operating current per channel
- F3 Brushed DSM Version:
- Designed to work with current Tiny Whoop/Inductrix setups
- Built in Spectrum DSMX native receiver
Specifications
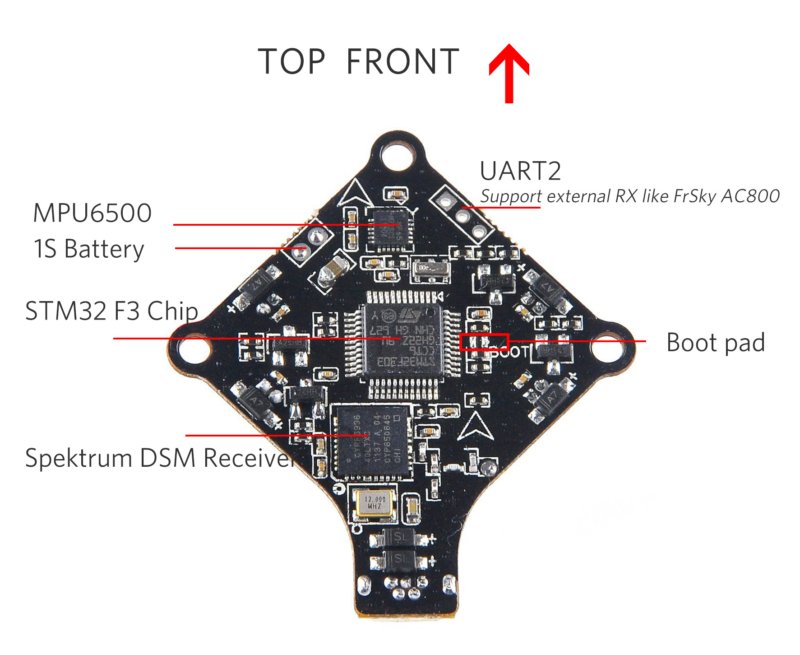
- CPU: STM32F303CCT6
- Six-Axis: MPU6500
- Size: 26mm x 26mm,fully compatible with the Inductrix quad frame and mounting pattern
- Weight:3.3g(F3 Brushed Version) OR 3.5g(F3 Brushed DSM Version)
Support FC Firmwares
![]()
![]()
F3 Brushed DSM Version
This board is designed to work with current Tiny Whoop/Inductrix setups, just replace the current board with our new board and experience the hobby level of flight control.
Compatible with ALL Spektrum radios(e.g. DX6,DX6i,DX7,DX8) or Spektrum compatible transmitter module(e.g. Turnigy 9X with OrangeRx module).
The flight controller board comes pre-flashed with BetaFlight.
F3 Brushed Version
This board is NOT designed to work with current Tiny Whoop/Inductrix setups.The large current MOS can't drive 6*15mm motor perfect.7*20mm or 8*20mm motors are recommended for this board.
Pay attention to the battery voltage selection before applying power.The default shipping is 1S (4.2V);For 2S battery,first need to disconnect the short contacts 1S, and then connect two 2S pads short.
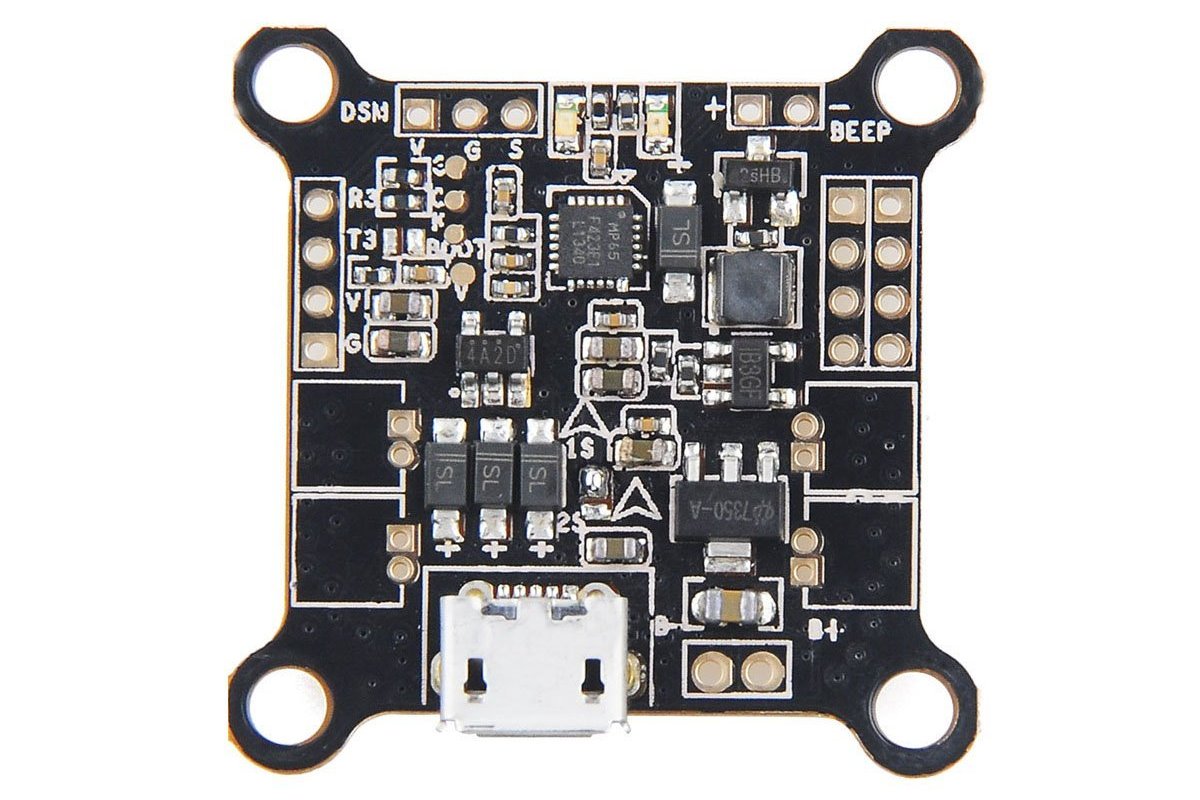
Receiver configuration:
- PPM and SBUS receiver welded to the UART2 GND, + 5V, RX2 above, SBUS signal CF in the software configuration
- DSM DSM receiver soldered directly to the interface 3.3V, GND, RX3, CF the software configuration UART3.

You could Buy on Amazon(F3 Brushed Version) Buy on Amazon(F3 Brushed DSM Version) or get even faster from local suppliers.
For more detail information,please Download User Manual
About how to bind transmitter,please click Binding Procedure for detail.
Flash Firmware
If you wish to flash a different firmware or update Betaflight to the newest version, please follow these steps.
1.Click the Firmware Flasher tab
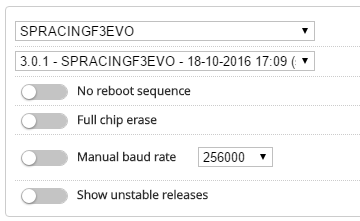
2.Select “SPRACINGF3EVO” as the board, and pick the version of Betaflight you wish to flash (latest is 3.0.1).
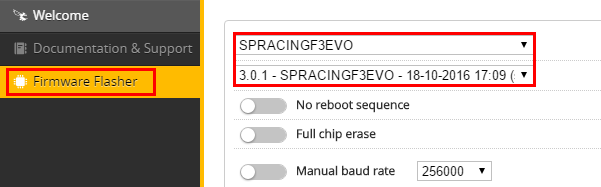
Do not use “SPRACINGF3” or other targets. If no firmware is currently available do NOT attempt to flash. Flashing the wrong firmware can cause the FC to be permanently damaged.
3.Click “Load firmware [Online]” and wait for firmware to download and read release notes before flashing.
Now there are two situations.If you have lost communication with the board and no reboot sequence(also called bootloader) exit,you should do as following.
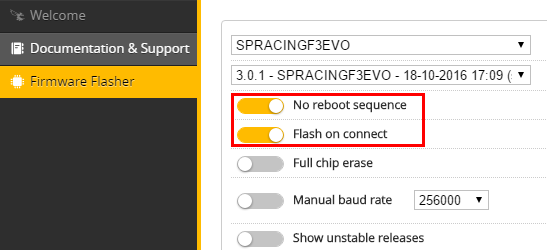
a).Enable “No reboot sequence”,enable “Full chip erase”.
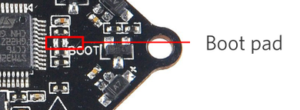
b).Jumper the BOOT pins and power on the board by connecting USB cable.Then remove the BOOT jumper.
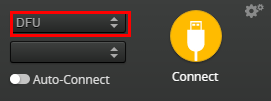
c).Now DFU will appear in the list of ports and flashing via DFU will available.Click “Flash Firmware”.After flashing the virtual COM port will appear as “COMxx”.
If reboot sequence(also called bootloader) exit and work well,you could flash the firmware without jumper the BOOT pins.This is the the state when the stock firmware works well and you want to upgrade to the latest version.Do as following.
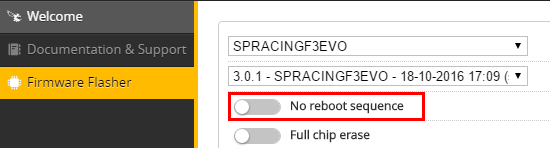
a).Disable “No reboot sequence”.
b).Power on the board by connecting USB cable.You could find the virtual COM port will appear on the up right corner.
c).Click “Flash Firmware”.First,the board will reboot into DFU mode.Then wait the ST DFU DRIVER Automatic installation.It’s successfully installed when you see the DFU port on the up right corner.Now flashing via DFU will proceed.After flashing the virtual COM port will re-appear.
Q:Unable to flash firmware via DFU.
Likely the correct DFU drivers are not installed. Put the board in BOOTLOADER mode (jump boot pins, connect USB cable). Then update DFU drivers.Here is the step:
Chrome may have problems automatically installed DFU driver for ST devices in DFU Mode on Windows.The solution is to replace the ST driver with a libusb driver.
Download and launch Zadig
a).Options -> List All Devices
b).Select STM32 Bootloader from the drop down.
c).Choose WinUSB as the replacement.
d).Click “Replace Driver”. Some times the Replace progress will be slow or no response, you can close it and do it again.
e).Restart Chrome (make sure it is completely closed, logout and login if unsure)
f).Now the DFU device should be seen by Configurator

Also you could see USB Flashing section of Betaflight/Cleanflight manual for details.
Q:The COM port does not show up.
Ensure latest USB STM VCP (Virtual Com Port) drivers are installed.
Frequently Asked Questions
Due to the overwhelming response from the customers, we have put together this FAQ to answer the most commonly asked questions.This section will grow as more and more members of the customers give us valuable feeedback and suggestions on how to improve the tune.
F3 Brushed Version
Q:Can it handle 2S batteries?
Yes,it supports 2s lipo battery,which could give you even more fierce racing experience than 1s.Bridge these two pins to support 2s battery as show below.
Q:Can it handle 8.5mm high-speed motors?
Yes, the board can run 8.5mm motors.
F3 Brushed DSM Version
Q:What radio control protocols are used by the board?
The DSMX compatible version uses PPM 7 Channel that is compatible will all DSMX and DSM2 Spectrum radios.
Any radio that can take the Orange Rx version module, such as the Turnigy 9X, is compatible with the DSMX version of the board.
Q:Can it handle 8.5mm high-speed motors?
Yes, the board can run 8.5mm motors, but our recommendation is to use the 6mm size motors.
Q:Can it handle 2S batteries?
No, it is designed to handle only 1S safely. Using higher cell batteries can damage the board.
General
Q:What Flight Modes does it have?
The board runs the popular Cleanflight/Betaflight firmware that is fully customizable and includes several different modes: Auto-Level, Horizon (auto-leveling mode with ability to flip), and full manual (rate). You can also enable AirMode and be able to control the quad at any speed and attitude
Q:What is the size of the motor micro JST plugs?
The board uses the JST 1.25 2 pin style plug
Q:Does it have Altitude Hold?
No, we are focused on making this board the lightest and most agile that it can be, and are excluding extra features such as altitude hold for the time being.
Q:Any experience loading Betaflight onto it?
You could follower this user manual to flash Beraflight firmware to the fc.This is the stardand process to flash F3 EVO fc.The followring image shows the Newest BF firmware we tested.
After the Betaflight firmware is flashed successfully,you need a little bit setup.
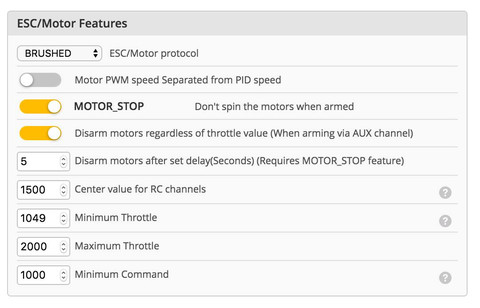
If the version of Betaflight you have is 3.0 or above,change ESC/Motor protocol to BRUSHED on the Configuration Tab.
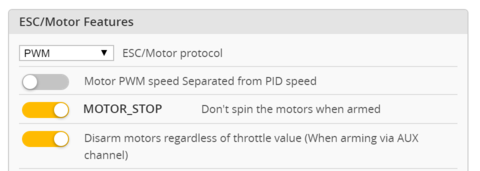
If the version of Betaflight you have is 2.9.1,set ESC/Motor protocol to PWM on the Configuration Tab
For all these firmwares,you need to go to CLI and type this in
set motor_pwm_rate=4000
save